PicSwitcher is quite flexible in the number of options that are available for altering images. In addition, each of these options can be turned on or off for each image selected. The alterations which are to be applied may be viewed in the file list view whenever the icons are visible, or by clicking an image and changing the options in the "Apply..." section of the main window.
Images may be rotated in 90 degree increments. You can select the rotation setting by clicking on the "Rotation" button under the "Applies..." section of the window, or by clicking on the rotation buttons just to the left of the image preview area.
PicSwitcher offers multiple modes for resizing images. These are:
| Keep Aspect Ratio, Keep Size: PicSwitcher will resize to the selected size, keep the existing aspect ratio, and fill in any leftover space with the background image or background color. | |
| Keep Aspect Ratio, Adjust Size: PicSwitcher will resize to the selected size, and adjust the dimensions to fit the original aspect ratio. | |
| Set Maximum Size: If the image is larger than the selected size, PicSwitcher will shrink it to fit. Otherwise it leaves the image in its original size. | |
| Stretch to Fit: The image will be stretched to fit the specified dimensions, ignoring the aspect ratio. | |
| Tile, Lock Upper Left: The image will be tiled to fit the output dimensions, locking the upper left of the first image in the upper left corner of the output image. | |
| Tile, Lock Center: The image will be tiled to fit the output dimensions, locking the center of the original image to the center of the output area. |
To specify the horizontal dimension of the output image, check the "Horiz" checkbox, select the appropriate units, and enter the dimension desired. The same applies for the vertical dimension. In addition to specifying absolute values, you can also specify values relative to the original size by prefixing the values with either a "+" (plus) or "-" (minus).
 PicSwitcher
provides the option of changing the background, adding a border, bevel, and/or overlaid
image on top of your images.
PicSwitcher
provides the option of changing the background, adding a border, bevel, and/or overlaid
image on top of your images.
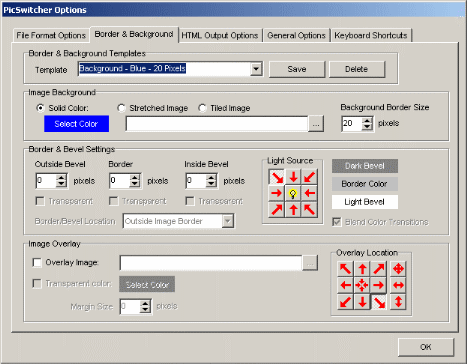
You may place a background behind your images using the "Image Background" settings. In the Limited Edition of PicSwitcher, only solid colors may be used. In other editions you can use images as well.
If you use the transparency option when working with single (or EMF/WMF) images, this background will also appear behind transparent portions of your image.
To help offset your image from the background, or just perhaps to improve their visual appeal, you can place a border and/or bevel around the images. The "Border & Bevel Settings" make this possible.
Begin by adjusting the Outside Bevel, Border, and Inside Bevel sizes. Once one of these has been set the other options will become enabled. Other options that can be adjusted include: transparency, location, light source, and colors.
The Image Overlay feature allows an image file to be placed on top of your images. For example, this could be used to add a company logo to all of your images.
Click the "..." button to select the image to overlay on top of your source images. If one of the colors of the image should be treated as if it were transparent, check the "Transparent color" option and click the "Select Color" button to specify this color. You can also specify the location of the overlay by clicking one of the buttons under "Overlay Location" and adjusting the "Margin Size" setting.
Templates for backgrounds, bevels, borders, and overlays can be saved by entering a name under "Border & Background Template" and clicking the "Save" button. A previously saved template can be recalled by clicking it in the drop-down list. Templates are saved as .PSBB files in the PicSwitcher program directory. These files can be exchanged with other PicSwitcher users if you find settings that you like. In addition, check back to the PicSwitcher web site for downloadable settings.
PicSwitcher supports an extensible plug-in architecture. This means that we can make plug-ins available in the future and extend the functionality of PicSwitcher. As shipped, multiple plug-ins are included.
A filter may be added to an image by clicking on the "Filters" button under "Apply..." A list of plug-in categories will appear, under each of which the available filters will be displayed. Any of these may be added by clicking on its name. If the selected plug-in requires configuration, the configuration window will appear.
When one more more filters are added, these will appear at the top of the list which appears when the Filters button is applied. For each of these plug-ins several options will be made available, including, but not limited to, copying the filter, removing it, configuring it (if supported), and moving it up or down in the list of applied filters.
To remove all filters, click the "Filters..." button and select "Remove All Filters."
Some filters cannot be used in the Limited Edition of PicSwitcher. These filters will appear disabled when the Limited Edition is used. To see a list of which filters can and cannot be used, see the "Different Editions" help page.
 Multiple
options are also available for adjusting the colors in your images. The
color levels may be adjusted by channel, hue, saturation, lightness, or
brightness.
Multiple
options are also available for adjusting the colors in your images. The
color levels may be adjusted by channel, hue, saturation, lightness, or
brightness.
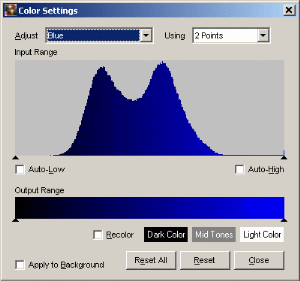
Click on the "Colors" button under "Apply..." or the color adjustment tool to bring up the Color Settings window. This window has several areas worth noting:
The first line allows selection of what type of adjustment to make, and whether to do it by changing just the high and low values, or a high, low, and mid-range value.
Immediately below this is the Input Range adjustment, featuring a histogram of the current adjustment setting. This allows you to see statistically where the range of values appears in the currently selected image. Immediately below the histogram you will find the adjustment points, which can be dragged with the mouse to change the input range.
If you wish to have PicSwitcher automatically select the high, low, or mid-range values, check the appropriate boxes below the input range histogram.
The output range can be set by dragging the adjustment points immediately below the output range display.
Images can also be recolored using the settings below the output range selection. Check the "Recolor" option and click each of the color buttons to change the colors used. The recolor feature is actually independent of the adjustment mode.
Two more options are available. When "Brightness" is selected as the adjustment mode, an option called "Eye Sensitivity Adj." changes the brightness histogram to show how the brightness of the image actually appears to the human eye. The "Apply to Background" option allows the color adjustment settings to be made to the background behind the image.
Below the tab pages and to the left of the image preview area are a few tools that can be used to manipulate the current image. These include (from top to bottom):
![]() Drag
tool: use this to scroll the image in the preview area if it is too large to
fit. When this tool is selected, you can click and drag the image to move
it. Alternately you can drag the image by clicking on and dragging it with
the right mouse button when any tool is selected.
Drag
tool: use this to scroll the image in the preview area if it is too large to
fit. When this tool is selected, you can click and drag the image to move
it. Alternately you can drag the image by clicking on and dragging it with
the right mouse button when any tool is selected.
Selection tool: Use the selection tool to specify an area of the image to crop, copy, or save to another file. After dragging over the image, a popup menu will appear with the available options. This menu can also be accessed by right-clicking inside the selected area. Click outside the selected area to clear the selection.
Red Eye Removal tool: use this tool to remove the red portions of eyes in flash photographs. This works by replacing everything with a red tint with black. Click and drag over the red area to remove.
Color Adjustment tool: This brings up the color adjustment window. The settings made here affect all images, not just the current image. The color settings will only be applied if the "Colors" option is selected in the "Apply..." window. See the image adjustment page for more information.
Transparency tool: This brings up the color selection window, where you can specify the color in the original image to be treated as if it were transparent, allowing the background to show through. To remove transparency from an image, click the transparency tool, and click the Cancel button.