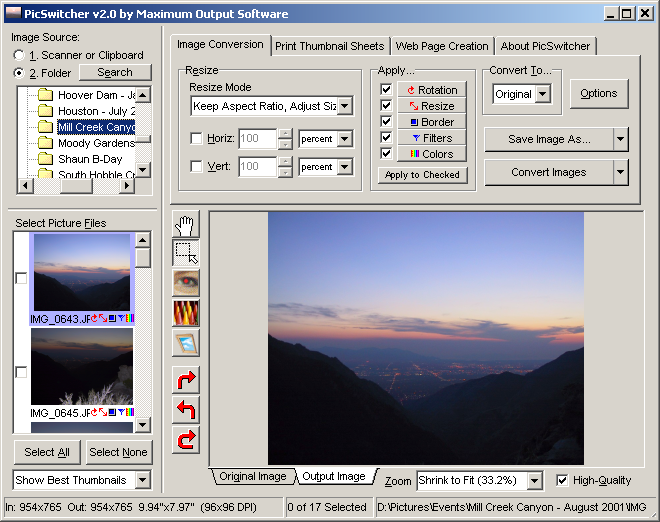
PicSwitcher's main feature is its ability to convert images between its supported formats, while allowing advanced features such as resizing, modifying colors, adding borders and bevels, and providing basic correction tools. This is all accomplished through the "Image Conversion" tab of the main window:
PicSwitcher has two modes of operation: manipulation of single images, and batch manipulation of multiple images. For the most part the available tools are the same, but there are some exceptions:
| Feature | Single Image |
Multiple Images |
Minimum
Edition Required |
| Acquire Images from Disk | Limited | ||
| Acquire Images from Scanner / Camera | Limited | ||
| Acquire Images from System Clipboard | Limited | ||
| Image Rotation | Limited | ||
| Resize | Limited | ||
| Add Background Image | Single
Color Background: Limited Background Images: Standard |
||
| Add Background, Borders, Bevels | Standard | ||
| Filters | Most
work with Limited, Some require Standard |
||
| Color Adjustment | Limited | ||
| Image Overlay | Standard | ||
| Cropping | Limited | ||
| Copy to Clipboard | Limited | ||
| Red Eye Removal | Limited | ||
| Make Image Transparent | Limited | ||
| Make Desktop Wallpaper | Limited | ||
| Send Images via Email | Limited |
Images may be retrieved from a folder on your computer, a scanner or digital camera, or the system clipboard.
 |
First,
select the "Scanner or Clipboard" option in the upper left hand
corner of the main PicSwitcher Window.
If you wish to use a scanner or digital camera:
If you wish to use the clipboard as your image source:
|
The "Auto-Convert Clipboard" option will set PicSwitcher into a mode where each time an image is placed on the clipboard it is automatically run through the conversion process and saved in the selected format in a directory specified when the option is first turned on.
 |
First,
click on "Folder" in the upper left-hand corner of the main
PicSwitcher window.
If you know the exact location of the image files you wish to convert, simply navigate to the appropriate folder in the space provided. Searching for Images
From here you can select a starting folder to search by clicking on the "..." button to the right of the current folder selection. You can then select the types of images to look for, and then click the "Go" button. PicSwitcher will search the selected folder and all of its subfolders and then report the number of images found in each folder. Clicking on a folder will select it as the image source in the main window. Once the Folder is SelectedYou will see a list of images on the left side of the window below the list of folders. Clicking on any of these images will preview it in the image preview area which makes up the largest portion of the main window after a short delay. To view the image without any delay double-click on it. |
Four different view modes are available when using a folder as your image source:
| Show Names Only | Show Names & Icons | Show Quick Thumbnails | Show Best Thumbnails |
 |
 |
 |
 |
| Use this mode if you only need to see the names of the files, do not require thumbnail previews, and will be using all conversion options. | Use this mode when you only need to see the names of the files, do not require thumbnail previews, but want to enable or disable certain conversion options for each image. | Use this mode when you want to see thumbnail previews, but do not require high quality thumbnails. | Use this mode when you want to see the highest quality thumbnail images and don't mind waiting a little extra time for the higher quality conversion. |
Right clicking in the image list will bring up a popup menu of options that can be performed on the images in the list.
If the main PicSwitcher window has been enlarged from its original size, you can adjust the amount of space allocated for the folder and image file list by dragging the divider bar between these lists and the rest of the window. This will allow display of longer file names, and larger thumbnail images. If the divider is moved far enough a new option, "Multiple Columns," will appear allowing more images to be displayed at a time.
Now that your image source is selected, let's move on to the next step, Selecting Images to Convert. More information is available on how to work with single images, multiple images, and the various conversion options which apply to each.
 If
you wish to search for images, click on the Search button. This will
bring up the screen shown at right.
If
you wish to search for images, click on the Search button. This will
bring up the screen shown at right.